Hold down the T key for 3 seconds to activate the audio accessibility mode, at which point you can click the K key to pause and resume audio. Useful for the Check Your Understanding and See Answers.

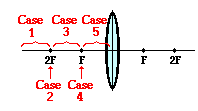
Previously in Lesson 5, ray diagrams were constructed in order to determine the general location, size, orientation, and type of image formed by double convex lenses. Perhaps you noticed that there is a definite relationship between the image characteristics and the location where an object placed in front of a double convex lens. The purpose of this portion of the lesson is to summarize these object-image relationships. The best means of summarizing this relationship is to divide the possible object locations into five general areas or points:
- Case 1: the object is located beyond the 2F point
- C
 ase 2: the object is located at the 2F point
- Case 3: the object is located between the 2F point and the focal point (F)
- Case 4: the object is located at the focal point (F)
- Case 5: the object is located in front of the focal point (F)
Case 1: The object is located beyond 2F
 When the object is located at a location beyond the 2F point, the image will always be located somewhere in between the 2F point and the focal point (F) on the other side of the lens. Regardless of exactly where the object is located, the image will be located in this specified region. In this case, the image will be an inverted image. That is to say, if the object is right side up, then the image is upside down. In this case, the image is reduced in size; in other words, the image dimensions are smaller than the object dimensions. If the object is a six-foot tall person, then the image is less than six feet tall. Earlier in Unit 13, the term magnification was introduced; the magnification is the ratio of the height of the object to the height of the image. In this case, the magnification is a number with an absolute value less than 1. Finally, the image is a real image. Light rays actually converge at the image location. If a sheet of paper were placed at the image location, the actual replica or likeness of the object would appear projected upon the sheet of paper.
Case 2: The object is located at 2F
 When the object is located at the 2F point, the image will also be located at the 2F point on the other side of the lens. In this case, the image will be inverted (i.e., a right side up object results in an upside-down image). The image dimensions are equal to the object dimensions. A six-foot tall person would have an image that is six feet tall; the absolute value of the magnification is exactly 1. Finally, the image is a real image. Light rays actually converge at the image location. As such, the image of the object could be projected upon a sheet of paper.
Case 3: The object is located between 2F and F
 When the object is located in front of the 2F point, the image will be located beyond the 2F point on the other side of the lens. Regardless of exactly where the object is located between 2F and F, the image will be located in the specified region. In this case, the image will be inverted (i.e., a right side up object results in an upside-down image). The image dimensions are larger than the object dimensions. A six-foot tall person would have an image that is larger than six feet tall. The absolute value of the magnification is greater than 1. Finally, the image is a real image. Light rays actually converge at the image location. As such, the image of the object could be projected upon a sheet of paper.
 Case 4: The object is located at F
When the object is located at the focal point, no image is formed. As discussed earlier in Lesson 5, the refracted rays neither converge nor diverge. After refracting, the light rays are traveling parallel to each other and cannot produce an image.
Case 5: The object is located in front of F
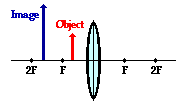
 When the object is located at a location in front of the focal point, the image will always be located somewhere on the same side of the lens as the object. Regardless of exactly where in front of F the object is located, the image will always be located on the object's side of the lens and somewhere further from the lens. The image is located behind the object. In this case, the image will be an upright image. That is to say, if the object is right side up, then the image will also be right side up. In this case, the image is enlarged; in other words, the image dimensions are greater than the object dimensions. A six-foot tall person would have an image that is larger than six feet tall. The magnification is greater than 1. Finally, the image is a virtual image. Light rays diverge upon refraction; for this reason, the image location can only be found by extending the refracted rays backwards on the object's side the lens. The point of their intersection is the virtual image location. It would appear to any observer as though light from the object were diverging from this location. Any attempt to project such an image upon a sheet of paper would fail since light does not actually pass through the image location.
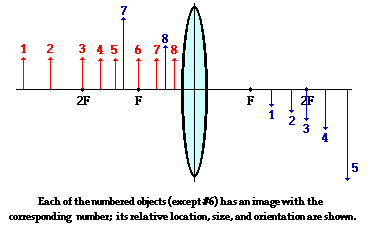
It might be noted from the above descriptions that there is a relationship between the object distance and object size and the image distance and image size. Starting from a large value, as the object distance decreases (i.e., the object is moved closer to the lens), the image distance increases; meanwhile, the image height increases. At the 2F point, the object distance equals the image distance and the object height equals the image height. As the object distance approaches one focal length, the image distance and image height approaches infinity. Finally, when the object distance is equal to exactly one focal length, there is no image. Then altering the object distance to values less than one focal length produces images that are upright, virtual and located on the same side of the lens as the object. Finally, if the object distance approaches 0, the image distance approaches 0 and the image height ultimately becomes equal to the object height. These patterns are depicted in the diagram below. Eight different object locations are drawn in red and labeled with a number; the corresponding image locations are drawn in blue and labeled with the identical number.

We Would Like to Suggest ...

Why just read about it and when you could be interacting with it? Interact - that's exactly what you do when you use one of The Physics Classroom's Interactives. We would like to suggest that you combine the reading of this page with the use of our
Optics Bench Interactive. You can find this in the Physics Interactives section of our website. The
Optics Bench Interactive provides the learner an interactive enivronment for exploring the formation of images by lenses and mirrors. Its like having a complete optics toolkit on your screen.
Check Your Understanding
1. Identify the means by which you can use a converging lens to form a real image.
2. Identify the means by which you can use a converging lens to form a virtual image.
3. A converging lens is sometimes used as a magnifying glass. Explain how this works; specifically, identify the general region where the object must be placed in order to produce the magnified effect.